Connecting to preferred WiFi without leaving the app in iOS 11.

With iOS 11 Apple included public APIs that we can use to programmatically join a WiFi without leaving your app. Not many people have noticed about it (that’s what I think! coz I didn’t notice it until recently!), so I thought like writing an article about it!
This operation is done with the help of NEHotspotConfigurationManager.
Step 1: Create a new project.
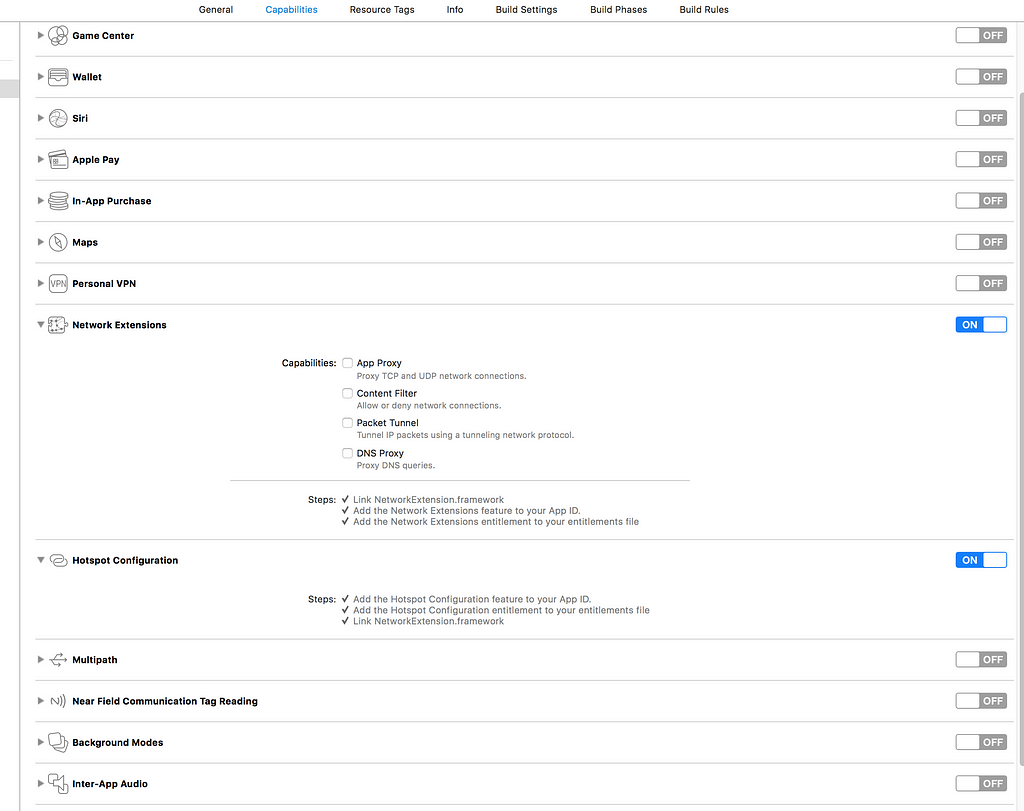
Step 2: Goto your project’s capabilities section and add the Network Extensions & Hotspot Configuration capabilities. This will add the {your_project_name}.entilements file to your project. Remember this is one of the most important steps here. If by any means this file is not included in your project and your app is crashing here and there, then you know where to look!

Step 3: Goto your viewcontroller of choice! import the NetworkExtension there.
import NetworkExtension
Step 4: From now on we are going to use the NEHotspotConfiguration & NEHotspotConfigurationManager classes. I assume that you already know the SSID(WiFi name) to which you want to connect to. You can connect to both SSID’s with or without a passphrase, but the methods used are slightly different. Now create your new NEHotspotConfiguration object.
let hotspotConfig = NEHotspotConfiguration(ssid: SSID)//Unsecured connections
//OR
let hotspotConfig = NEHotspotConfiguration(ssid: SSID, passphrase: passphrase, isWEP: false)//Secured connections
The method returns a NEHotspotConfiguration object. It contains Configuration settings for a Wi-Fi network hotspot.
The NEHotspotConfigurationclass contains configuration properties and credentials required to connect to Wi-Fi networks.
The parameter ssid is the name of your WiFi/Hotspot. For further information on both methods you can do ‘Option + Click’ on the method in xcode.
Step 5: The NEHotspotConfigurationManager is a singleton class. Use the code below to create the connection:
NEHotspotConfigurationManager.shared.apply(hotspotConfig) {[unowned self] (error) in
if let error = error {
print("error = ",error)
}
else {
print("Success!")
}
}
Voila! its done the app will now ask the user to confirm the action and now will connect to the WiFi/Hotspot.
Apple has also provided a way to remove the network configuration:
NEHotspotConfigurationManager.shared.removeConfiguration(forSSID: SSID)
List all the networks already configured:
NEHotspotConfigurationManager.shared.getConfiguredSSIDs { (ssidsArray) in
for ssid in ssidsArray {
print("ssid = ",ssid)
}
}
Things that you should take care of (Or the mistakes I made during the trial run!)
- If the SSID has spaces and other blank spaces and you enter it as it is — it will not work!
- If the is a typo in the SSID you entered it will create a configuration but you won’t be able to connect.
- You cannot run this in the simulator.
- Your device should be running iOS 11.* or greater and your should be xcode 9.* or greater.
- When you try to configure a network which is already configured — you will get an error.
- Once you delete the app the configurations related to that app is also gone, poof!…
Stuff that I would love to have:
- A way to list all the networks that are not associated with the app.
- A way to connect again with the already existing configurations.
You can explore more from here:
- NEHotspotConfigurationManager
- kraigspear’s GIST
Background for the ariticle
I am trying to build an IoT project with iOS for F22Labs and stumbled upon on the existence of NEHotspotConfigurationManager & NetworkExtension . Once I’ve explored more I will publish another article.
Tips & Tricks
Creating a video of your iOS app running in the Xcode simulator is as simple running the following from a terminal on macOs:
xcrun simctl io booted recordVideo filename.mov